Default Loadable Configurations
The default loadable configurations have been created using the iron-skillet default and sample values. These configurations can be loaded into Panorama or a firewall for day one purposes.
Warning
Before committing the default configuration, be sure to edit the superuser name and password to avoid unauthorized access
Note
The values for syslog IP address, the email profile, and the config export IP address are sample information and should be updated specific to the user’s environment.
Each directory corresponds to variations in the configuration specific to the Panorama and firewall management IP addresses:
- sample-cloud options: management interfaces for Panorama and PAN-OS use DHCP
- sample-mgmt-dhcp: PAN-OS default to DHCP while Panorama uses a static IP interface
- sample-mgmt-static: both PAN-OS and Panorama use static IP Interfaces for management
Included for each type are a set command .conf file and xml full configuration file. Both include the same configurations. Also in each directory is the config_variables.yaml file to see what values were used to create the full configuration.
Note
Panorama can be configured using shared elements and device-specific elements. The default loadable configuration are specific to the shared model only.
SET commands
This model uses traditional CLI ‘copy-and-paste’ to load in the configuration line by line. Users can elect to edit default values for their specific deployment as each line is added or load the configuration as-is and then edit using the instructions below for GUI variable edits or CLI variable edits to the default configuration.
Note
The set command conf file includes options for standard/static or dhcp management interfaces. Only load the commands specific to the interface type to be used.
Adding the configuration with set commands
- get the conf file specific to the deployment type
- log into the CLI and enter configure for configuration mode
- copy set commands from the .conf file and paste into the terminal
Note
It is recommended that the user only grab 30-40 set commands per paste to avoid any buffer issues resulting in errors.
XML configuration file
The full configuration file can be imported and loaded using the management GUI.
Instead of using scripting tools, the instructions below allow a user to Import and Load a candidate configuration
that can be manually edited by GUI variable edits or CLI variable edits.
Warning
Loading a full configuration file will replace the existing candidate configuration. Save a copy of the existing configuration prior to loading the iron-skillet xml configuration file. Edit any local values before committing as a running configuration.
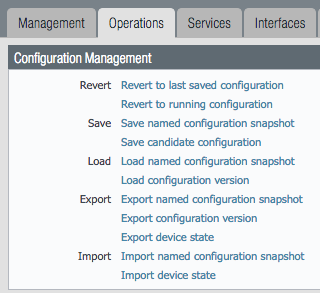
Import the configuration file using the GUI
- Click on the
Devicetab - Select
Setupin the left nav bar - Click on the
Operationstab - Then
Import named configuration snapshotchoosing the day one config xml file
Note
You should perform a Save named configuration snapshot as backup prior to loading the new configuration
Load the configuration
- Still under the
Operationstab, useLoad named configuration snapshotchoosing the day one config xml file - Ensure no errors loading the configuration.
Note
If you see {{ text }} related import or load errors ensure you have the template file imported from the loadable_configs directory and not the templates directory.
GUI variable edits
After loading the configurations using set or xml commands, users can edit specific values instead of using the iron-skillet defaults.
The complete list of variables used by iron-skillet can be found at Creating Loadable Configurations.
GUI variable edits: Firewall
The steps below are for a stand-alone NGFW platform without Panorama.
Device tab edits
The following edits are found under the Device tab

From here the following edits can be made:
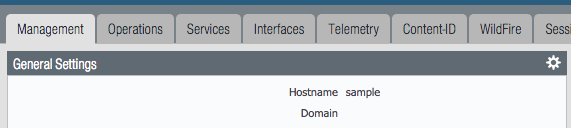
Hostname
- Go to Device –> Setup –> Management
- Click the
gearicon to edit the hostname
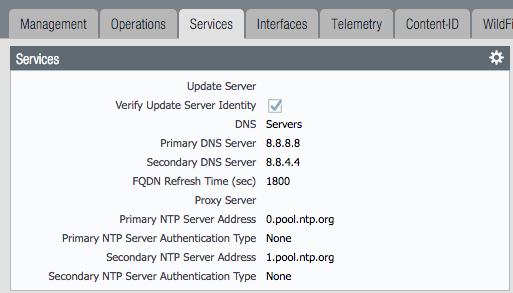
DNS and NTP servers
- Go to Device –> Setup –> Services
- Click the
gearicon to edit the server values - Choose the Services (DNS) and NTP tabs accordingly
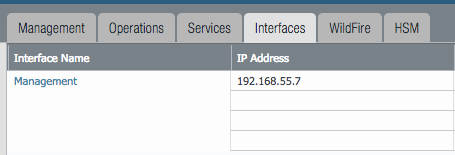
Static Management Interface
For a static management interface configuration, edit the IP address, subnet mask, default gateway.
- Go to Device –> Setup –> Interfaces
- Click on the
Managementlink - Edit the management interface attributes

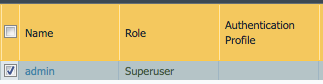
Superuser Administrator
The sample configuration uses the default admin/admin username and password setting. It is recommended to remove this user and add a new superuser or at a minimum change the admin user password.
- Go to Device –> Administrators
- Select and delete the
adminuser account - Choose to
Adda new user entering the username and password in the pop-up window
Syslog IP Address
Syslog is used to send traffic, threat and other log updates to an external system.
- Go to Device –> Server Profiles –> Syslog
- Click on the Sample_Syslog_Profile link and edit the IP address

Email Server Profile
The email profile is used to send key alerts to select recipients.
- Go to Device –> Server Profiles –> Email
- Click on the Sample_Email_Profile link and edit the from, to, and gateway values in the pop-up window.

Object tab edits
The following edits are found under the Objects tab

From here the following edits can be made:
Addresses
The template uses two address objects for sinkhole values, one each for IPv4 and IPv6. These are referenced in security rules.
- Go to Objects –> Address
- Click on the Sinkhole IPv4 and IPv6 links and edit the IP address

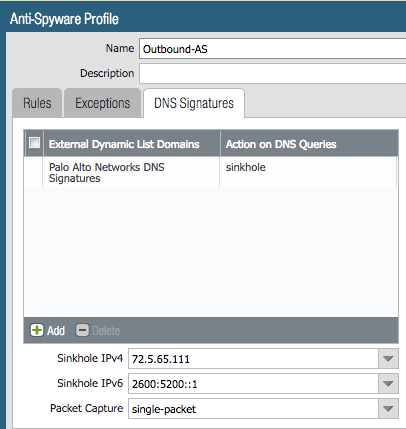
Anti-Spyware Security Profiles
The templates define multiple named Anti-Spyware profiles all appended with -AS. Each of these profiles must be
updated with new sinkhole address if non-default values are required.
These values should match the sinkhole IP addresses configured under Addresses.
- Go to Objects –> Security Profiles –> Anti-Spyware
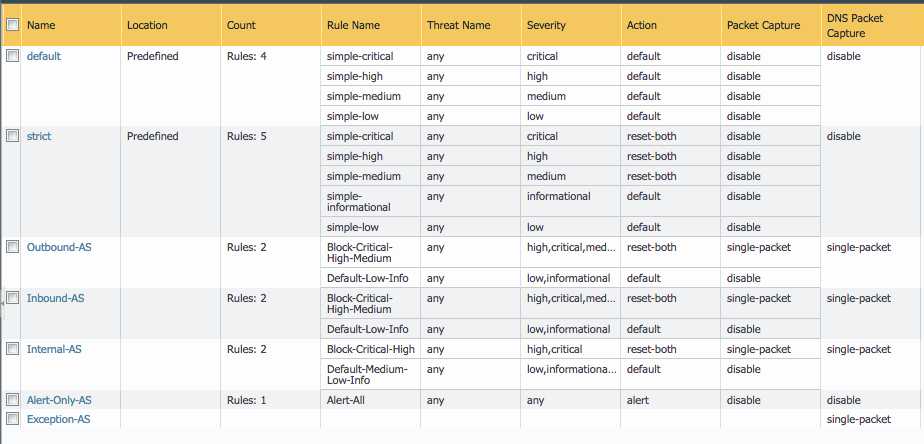
- Click on one of the template specific profiles ending in
-AS - Click on the DNS Signatures tab and update the IPv4 and IPv6 sinkhole addresses
GUI variable edits: Panorama
The steps below are for edits to the Panorama configuration. Variable edits in the GUI will include both the Panorama system edits and managed firewall device-group and template configurations.
The are four areas to be edited:
- Panorama platform settings
- iron-skillet template for shared device and network items
- sample template stack for device-specific items
- Shared device-group for shared objects and policies
Panorama tab edits
The following edits are found under the Panorama tab

From here the following edits can be made:
Panorama > Hostname
- Go to Panorama –> Setup –> Management
- Click the
gearicon to edit the Panorama hostname
Panorama > DNS and NTP servers
- Go to Panorama –> Setup –> Services
- Click the
gearicon to edit the server values - Choose the Services (DNS) and NTP tabs accordingly
Panorama > Management Interface
This configuration is specific to the Panorama management interface when statically defined.
- Go to Panorama –> Setup –> Interfaces
- Click on the
Managementlink - Edit the management interface attributes
Panorama > Superuser Administrator
The sample configuration uses the default admin/admin username and password setting. It is recommended to remove this user and add a new superuser or at a minimum change the admin user password.
- Go to Panorama –> Administrators
- Select and delete the
adminuser account - Choose to
Adda new user entering the username and password in the pop-up window
Panorama > Syslog IP Address
Syslog is used to send traffic, threat and other log updates to an external system.
- Go to Panorama –> Server Profiles –> Syslog
- Click on the Sample_Syslog_Profile link and edit the IP address
Panorama > Email Server Profile
The email profile is used to send key alerts to select recipients.
- Go to Panorama –> Server Profiles –> Email
- Click on the Sample_Email_Profile link and edit the from, to, and gateway values in the pop-up window.
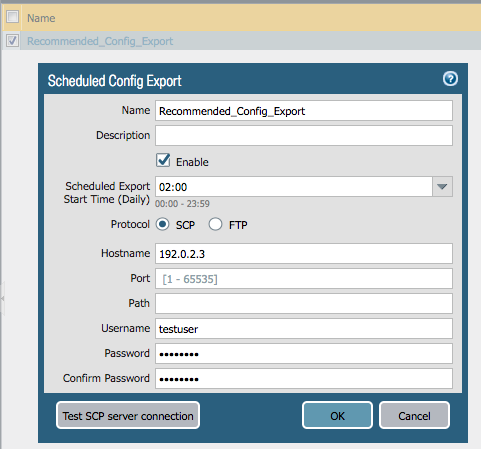
Panorama > Config Bundle Export Server
- Go to Panorama –> Scheduled Config Export
- Click on the Recommended_Config_Export link
- In the pop-up window, edit the Hostname value
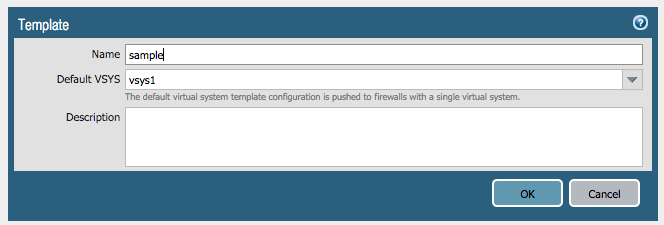
Panorama > Template Stack
- Go to Panorama –> Template
- Click on the
sample_stacklink and edit the name
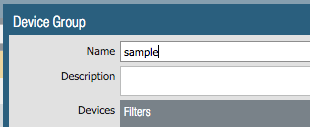
Panorama > Device-Group
- Go to Panorama –> Device-Groups
- Click on the
sample_devicegrouplink and edit the name
Templates > Device tab edits
The following edits are found under the Device tab

Note
The edits are grouped by the iron-skillet template edits and sample_stack template stack edits
** iron-skillet template edits**
Note
Make sure the template selected in the GUI is iron-skillet before completing the steps below
DNS and NTP servers
- Go to Device –> Setup –> Services
- Click the
gearicon to edit the server values - Choose the Services (DNS) and NTP tabs accordingly
Superuser Administrator
The sample configuration uses the default admin/admin username and password setting. It is recommended to remove this user and add a new superuser or at a minimum change the admin user password.
- Go to Device –> Administrators
- Select and delete the
adminuser account - Choose to
Adda new user entering the username and password in the pop-up window
Syslog IP Address
Syslog is used to send traffic, threat and other log updates to an external system.
- Go to Device –> Server Profiles –> Syslog
- Click on the Sample_Syslog_Profile link and edit the IP address
Email Server Profile
The email profile is used to send key alerts to select recipients.
- Go to Device –> Server Profiles –> Email
- Click on the Sample_Email_Profile link and edit the from, to, and gateway values in the pop-up window.
** iron-skillet template edits**
Note
Make sure the template selected in the GUI is sample_stack (or the updated name) before completing the steps below
Hostname
- Go to Device –> Setup –> Management
- Click the
gearicon to edit the hostname
Static Management Interface
For a static management interface configuration, edit the IP address, subnet mask, default gateway.
- Go to Device –> Setup –> Interfaces
- Click on the
Managementlink - Edit the management interface attributes
** Shared device-group edits**
Note
Make sure the device-group selected in the GUI is Shared before completing the steps below
Device-Group > Objects tab edits
The following edits are found under the Objects tab
From here the following edits can be made:
Addresses
The template uses two address objects for sinkhole values, one each for IPv4 and IPv6. These are referenced in security rules.
- Go to Objects –> Address
- Click on the Sinkhole IPv4 and IPv6 links and edit the IP address
Anti-Spyware Security Profiles
The templates define multiple named Anti-Spyware profiles all appended with -AS. Each of these profiles must be
updated with new sinkhole address if non-default values are required.
These values should match the sinkhole IP addresses configured under Addresses.
- Go to Objects –> Security Profiles –> Anti-Spyware
- Click on one of the template specific profiles ending in
-AS - Click on the DNS Signatures tab and update the IPv4 and IPv6 sinkhole addresses
CLI variable edits
After loading the configurations using set or xml commands, users can edit specific values instead of using the iron-skillet defaults.
The complete list of variables used by iron-skillet can be found at Creating Loadable Configurations.
CLI variable edits: Firewall
This section is specific to a non-Panorama managed NGFW.
Instead of using the GUI to make template edits for each variable value, below are steps using SET commands to make the same candidate configuration changes.
The {{ text }} values denotes where a variable is used in the template.
Hostname
set deviceconfig system hostname {{ hostname }}
DNS and NTP Servers
set deviceconfig system dns-setting servers primary {{ DNS 1 }} secondary {{ DNS 2 }}
set deviceconfig system ntp-servers primary-ntp-server ntp-server-address {{ NTP 1 }}
set deviceconfig system ntp-servers secondary-ntp-server ntp-server-address {{ NTP 2 }}
Static management interface
set deviceconfig system ip-address {{ ip address }} netmask {{ mask }} default-gateway {{ gateway }}
Superuser admin account
set mgt-config users {{ username }} permissions role-based superuser yes
set mgt-config users {{ username }} password
When the password command is entered, the user will be prompted for a password.
Syslog and Email Server Profiles
set shared log-settings syslog Sample_Syslog_Profile server Sample_Syslog server {{ ip address }}
set shared log-settings email Sample_Email_Profile server Sample_Email_Profile from {{ from }}
set shared log-settings email Sample_Email_Profile server Sample_Email_Profile to {{ to }}
set shared log-settings email Sample_Email_Profile server Sample_Email_Profile gateway {{ address }}
Address Objects
set address Sinkhole-IPv4 ip-netmask {{ IPv4 address }}
set address Sinkhole-IPv6 ip-netmask {{ IPv6 address }}
Anti-Spyware Security Profiles
The same commands are used across all of the template security profiles ending in -AS.
set profiles spyware {{ profile name }} botnet-domains sinkhole ipv4-address {{ IPv4 address }}
set profiles spyware {{ profile name }} botnet-domains sinkhole ipv6-address {{ IPv6 address }}
CLI variable edits: Panorama
This section is specific to configuration of a Panorama management system.
Instead of using the GUI to make template edits for each variable value, below are steps using SET commands to make the same candidate configuration changes.
The {{ text }} values denotes where a variable is used in the template.
Note
The initial configurations are specific to the Panorama platform itself. The managed firewall configurations are added under the template and device-group configurations.
Panorama > Hostname
set deviceconfig system hostname {{ hostname }}
Panorama > DNS and NTP Servers
set deviceconfig system dns-setting servers primary {{ DNS 1 }} secondary {{ DNS 2 }}
set deviceconfig system ntp-servers primary-ntp-server ntp-server-address {{ NTP 1 }}
set deviceconfig system ntp-servers secondary-ntp-server ntp-server-address {{ NTP 2 }}
Panorama > Static management interface
set deviceconfig system ip-address {{ ip address }} netmask {{ mask }} default-gateway {{ gateway }}
Panorama > Superuser admin account
set mgt-config users {{ username }} permissions role-based superuser yes
set mgt-config users {{ username }} password
When the password command is entered, the user will be prompted for a password.
Panorama > Syslog and Email Server Profiles
set panorama log-settings syslog Sample_Syslog_Profile server Sample_Syslog server {{ ip address }}
set panorama log-settings email Sample_Email_Profile server Sample_Email_Profile from {{ from }}
set panorama log-settings email Sample_Email_Profile server Sample_Email_Profile to {{ to }}
set panorama log-settings email Sample_Email_Profile server Sample_Email_Profile gateway {{ address }}
Panorama > Config Bundle Export Schedule
set deviceconfig system config-bundle-export-schedule Recommended_Config_Export protocol scp hostname {{ ip address }}
Note
The configuration for Panorama has some element in the iron-skillet shared template and others specific to the device captured as a template-stack called sample_stack. The same is true for device-group items that are either shared or contained in a device-specific group, namely reports.
Template > Hostname
set template-stack sample_stack config deviceconfig system hostname {{ hostname }}
Template > DNS and NTP Servers
set template iron-skillet config deviceconfig system dns-setting servers primary {{ DNS 1 }} secondary {{ DNS 2 }}
set template iron-skillet config deviceconfig system ntp-servers primary-ntp-server ntp-server-address {{ NTP 1 }}
set template iron-skillet config deviceconfig system ntp-servers secondary-ntp-server ntp-server-address {{ NTP 2 }}
Template > Static management interface
This is to be configured for a firewall with a static management interface.
set template-stack sample_stack config deviceconfig system ip-address {{ ip address }}
set template-stack sample_stack config deviceconfig system netmask {{ mask }}
set template-stack sample_stack config deviceconfig system default-gateway {{ gateway }}
Template > Superuser admin account
set template iron-skillet config mgt-config users {{ username }} permissions role-based superuser yes
set template iron-skillet config mgt-config users {{ username }} password
When the password command is entered, the user will be prompted for a password.
Template > Syslog and Email Server Profiles
set template iron-skillet config shared log-settings syslog Sample_Syslog_Profile server Sample_Syslog server {{ ip address }}
set template iron-skillet config shared log-settings email Sample_Email_Profile server Sample_Email_Profile from {{ from }}
set template iron-skillet config shared log-settings email Sample_Email_Profile server Sample_Email_Profile to {{ to }}
set template iron-skillet config shared log-settings email Sample_Email_Profile server Sample_Email_Profile gateway {{ address }}
Device-Group > Address Objects
set shared address Sinkhole-IPv4 ip-netmask {{ IPv4 address }}
set shared address Sinkhole-IPv6 ip-netmask {{ IPv6 address }}
Device-Group Anti-Spyware Security Profiles
The same commands are used across all of the templated security profiles ending in -AS.
set shared profiles spyware {{ profile name }} botnet-domains sinkhole ipv4-address {{ IPv4 address }}
set shared sample profiles spyware {{ profile name }} botnet-domains sinkhole ipv6-address {{ IPv6 address }}